# 유틸리티를 제공하는 패키지 설치: yum-utils
sudo yum install -y yum-utils

# 리포지토리 설정
 sudo yum-config-manager \
    --add-repo \
    https://download.docker.com/linux/centos/docker-ce.repo
도커 엔진 설치
최신 버전의 Docker Engine, containerd 및 Docker Compose 설치
# 최신 버전 설치 시
sudo yum install docker-ce docker-ce-cli containerd.io docker-compose-plugin

# 또는 특정 버전 설치 시
 sudo yum install docker-ce-<VERSION_STRING> docker-ce-cli-<VERSION_STRING> containerd.io docker-compose-plugin
- 에러 발생 3: Vagrantfile에 네트워크 설정을 했음에도 불구하고 static 설정이 되지 않음
- 해결
# 플러그인 버전 확인
# 낮은 버전이라면 업데이트 필요

PS C:\HashiCorp\ansible> vagrant plugin update
Updating installed plugins...
Fetching vagrant-vbguest-0.30.0.gem
Successfully uninstalled vagrant-vbguest-0.21.0
Updated 'vagrant-vbguest' to version '0.30.0'!


PS C:\HashiCorp\ansible> vagrant plugin list
vagrant-hostmanager (1.8.9, global)
  - Version Constraint: > 0
vagrant-vbguest (0.30.0, global)
  - Version Constraint: > 0
# 모든 가상 머신에서 사용자 생성
# 사용자 생성
[vagrant@control ~]$ sudo useradd ansible

# 패스워드 설정
[vagrant@control ~]$ sudo passwd ansible

# 패스워드 입력 없이 원격 접속하도록 설정
# 1. 컨트롤 노드에서 ssh 생성
# 2. 호스트로 복사 (host1, host2, host3, host4)

[vagrant@control-node ~]$ ssh-keygen
Generating public/private rsa key pair.
Enter file in which to save the key (/home/vagrant/.ssh/id_rsa):
Enter passphrase (empty for no passphrase):
Enter same passphrase again:
Your identification has been saved in /home/vagrant/.ssh/id_rsa.
Your public key has been saved in /home/vagrant/.ssh/id_rsa.pub.
The key fingerprint is:
SHA256:3lhOyiezamELTdrmy5HRbx7pw02DesuW6EcwACqeJhY vagrant@control-node
The key's randomart image is:
+---[RSA 2048]----+
|    ..           |
|   .  .          |
|.E.    .         |
|..o   ..o        |
|.=   =. Soo.     |
|+   o *= Oo.o    |
|     =ooB=O+ .   |
|     .+.oXB..    |
|     .++o+=o     |
+----[SHA256]-----+


# host[1..4] 설정
[vagrant@control-node ~]$ ssh-copy-id ansible@host1
/usr/bin/ssh-copy-id: INFO: Source of key(s) to be installed: "/home/vagrant/.ssh/id_rsa.pub"
/usr/bin/ssh-copy-id: INFO: attempting to log in with the new key(s), to filter out any that are already installed
/usr/bin/ssh-copy-id: INFO: 1 key(s) remain to be installed -- if you are prompted now it is to install the new keys
ansible@host1's password:

Number of key(s) added: 1

Now try logging into the machine, with:   "ssh 'ansible@host1'"
and check to make sure that only the key(s) you wanted were added.

[vagrant@control-node ~]$ ssh ansible@host1
Last failed login: Tue Jun  7 09:33:07 UTC 2022 from 192.168.56.100 on ssh:notty
There were 25 failed login attempts since the last successful login.
[ansible@host1 ~]$
host4에서 에러 발생: ansible 사용자 생성 시 디렉토리가 자동으로 생성되지 않음
[vagrant@control-node ~]$ ssh-copy-id ansible@host4
/usr/bin/ssh-copy-id: INFO: Source of key(s) to be installed: "/home/vagrant/.ssh/id_rsa.pub"
/usr/bin/ssh-copy-id: INFO: attempting to log in with the new key(s), to filter out any that are already installed
/usr/bin/ssh-copy-id: INFO: 1 key(s) remain to be installed -- if you are prompted now it is to install the new keys
ansible@host4's password:
Could not chdir to home directory /home/ansible: No such file or directory
sh: 1: cd: can't cd to /home/ansible
mkdir: cannot create directory ‘.ssh’: Permission denied

vagrant@host4:~$ ls -l /home
total 8
drwxr-xr-x 3 ubuntu  ubuntu  4096 Jun  7 07:36 ubuntu
drwxr-xr-x 4 vagrant vagrant 4096 Jun  7 07:51 vagrant
해결: 디렉토리 수동 생성
vagrant@host4:~$ sudo mkdir /home/ansible
vagrant@host4:~$ sudo chown ansible:ansible /home/ansible
vagrant@host4:~$ sudo chmod 755 /home/ansible
vagrant@host4:~$ sudo ls -l /home
total 12
drwxr-xr-x 2 ansible ansible 4096 Jun  7 09:44 ansible
drwxr-xr-x 3 ubuntu  ubuntu  4096 Jun  7 07:36 ubuntu
drwxr-xr-x 4 vagrant vagrant 4096 Jun  7 07:51 vagrant
8. sudo 설정
패스워드 없이 sudo 명령어 사용 설정
[vagrant@control-node ~]$ sudo ls /etc/sudoers.d
vagrant
[vagrant@control-node ~]$ sudo cat /etc/sudoers.d/vagrant
%vagrant ALL=(ALL) NOPASSWD: ALL
[vagrant@control-node ~]$
[vagrant@control-node ~]$ sudo grep wheel /etc/sudoers
## Allows people in group wheel to run all commands
%wheel  ALL=(ALL)       ALL
# %wheel        ALL=(ALL)       NOPASSWD: ALL


# 모든 가상 머신에서 파일 생성
[vagrant@control-node ~]$ sudo vi /etc/sudoers.d/ansible
ansible ALL=(ALL) NOPASSWD: ALL
ansible 파일 생성 전
[vagrant@control-node ~]$ ssh ansible@host1 "sudo id"

We trust you have received the usual lecture from the local System
Administrator. It usually boils down to these three things:

    #1) Respect the privacy of others.
    #2) Think before you type.
    #3) With great power comes great responsibility.

sudo: no tty present and no askpass program specified
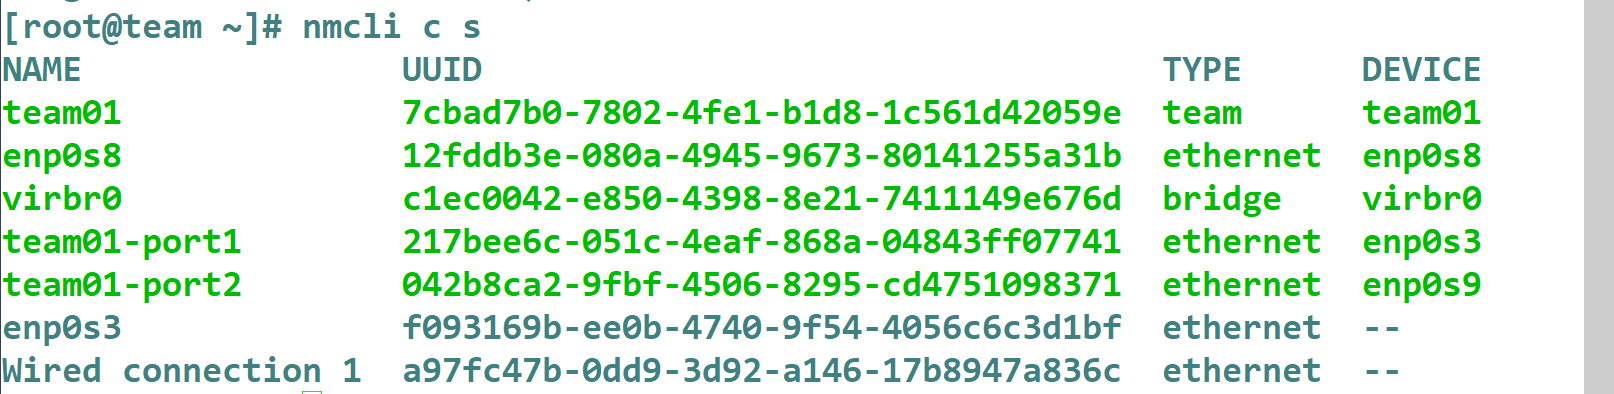
# 연결된 인터페이스 확인
[root@team ~]# nmcli c s
NAME UUID TYPE DEVICE
Wired connection 1 a97fc47b-0dd9-3d92-a146-17b8947a836c ethernet enp0s9
enp0s8 12fddb3e-080a-4945-9673-80141255a31b ethernet enp0s8
virbr0 c1ec0042-e850-4398-8e21-7411149e676d bridge virbr0
enp0s3 f093169b-ee0b-4740-9f54-4056c6c3d1bf ethernet --
# NAT 네트워크 비활성화
[root@team ~]# nmcli con down enp0s3
[root@team ~]# nmcli con down Wired connection 1
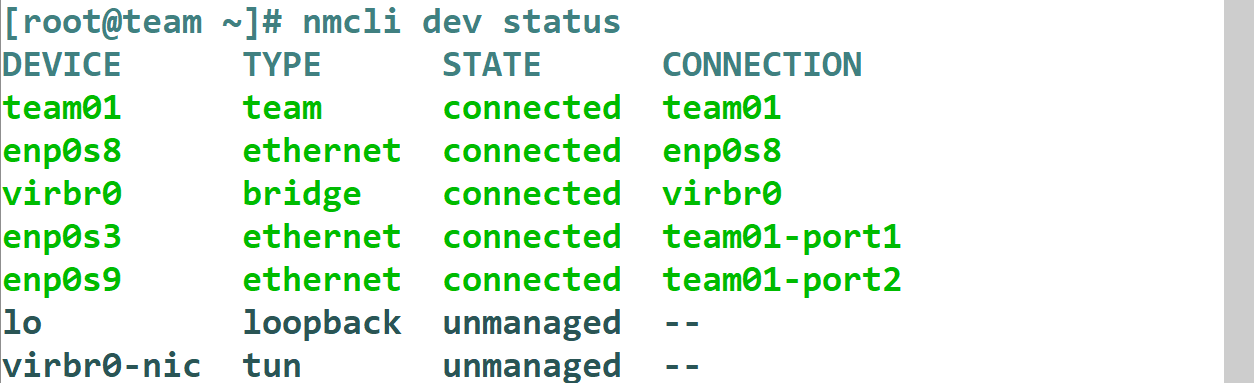
# 인터페이스 상태 확인
[root@team ~]# nmcli dev status
DEVICE TYPE STATE CONNECTION
enp0s8 ethernet connected enp0s8
virbr0 bridge connected virbr0
enp0s3 ethernet disconnected --
enp0s9 ethernet disconnected --
lo loopback unmanaged --
virbr0-nic tun unmanaged --
팀 인터페이스 생성 (team01: 가상 인터페이스)
# type: team / team-slave
1) team: 팀 인터페이스
2) team-slave: 포트 인터페이스
# config: 러너 방식 (json 문법)
***작성 시 주의: 입력 시 오타에 대한 오류가 발생하지 않음
[root@team ~]# nmcli connection add type team con-name team01 ifname team01 config '{"runner": {"name": "activebackup"}}'
Connection 'team01' (7cbad7b0-7802-4fe1-b1d8-1c561d42059e) successfully added.
team01 가상 인터페이스는 생성되었으나 실제 IP 주소가 할당되지 않은 상태
생성한 팀 인터페이스에 IP 주소 정적 할당
[root@team ~]# nmcli con mod team01 ipv4.addresses 10.0.2.110/24
[root@team ~]# nmcli con mod team01 ipv4.gateway 10.0.2.1
[root@team ~]# nmcli con mod team01 ipv4.dns 8.8.8.8
[root@team ~]# nmcli con mod team01 ipv4.method manual
[root@team ~]# nmcli con up team01
Connection successfully activated (master waiting for slaves) (D-Bus active path: /org/freedesktop/NetworkManager/ActiveConnection/14)

[root@team ~]# teamdctl team01 state
...
ipv4.method:                            manual
ipv4.dns:                               8.8.8.8
ipv4.dns-search:                        --
ipv4.dns-options:                       ""
ipv4.dns-priority:                      0
ipv4.addresses:                         10.0.2.110/24
ipv4.gateway:                           10.0.2.1
...
포트 인터페이스 생성 (team01-port1, team01-port2: 물리 인터페이스)
[root@team ~]# nmcli con up team01-port1
Connection successfully activated (D-Bus active path: /org/freedesktop/NetworkManager/ActiveConnection/13)

[root@team ~]# nmcli con up team01-port2
Connection successfully activated (D-Bus active path: /org/freedesktop/NetworkManager/ActiveConnection/12)

[root@team ~]# nmcli con up team01
Connection successfully activated (master waiting for slaves) (D-Bus active path: /org/freedesktop/NetworkManager/ActiveConnection/8)
참고: 설정한 러너 변경
1) nmcli con mod team01 team.config '{"runner ....
2) 별도의 json 형태의 파일을 이용 가능
-> nmcli con mod team01 team.config FILE
/usr/share/doc/team-XXX/example_configs/ 에서 참고
nmcli con mod team01 team.config '{"runner": {"name": "roundrobin"}}'