728x90

Windows 10 환경에서 테라폼 설치


1. 테라폼 설치 파일 다운로드

2. 테라폼을 설치할 terraform 폴더 생성

3. 환경 변수 설정

4. cmd 또는 powershell에서 작업


테라폼 설치


Windows


테라폼 설치 파일 다운로드

아래 링크로 접속

https://www.terraform.io/downloads


Downloads | Terraform by HashiCorp

Terraform is an open-source infrastructure as code software tool that enables you to safely and predictably create, change, and improve infrastructure.

www.terraform.io


OS 환경에 맞는 버전을 선택하여 다운로드


Windows


cmd 또는 powershell 둘 중에 한 곳에서만 설정해도 무방

 1) cmd 터미널에서 작업


C:\Users\khj78>mkdir terraform

C:\Users\khj78>cd terraform

# 환경 변수 설정: terraform 명령을 실행할 수 있도록 경로 설정
C:\Users\khj78\terraform>set PATH=/Users/khj78/terraform/:$PATH

# 테라폼에 대한 도움말 확인 > 테라폼 설치 완료
C:\Users\khj78\terraform>terraform
Usage: terraform [global options] <subcommand> [args]

The available commands for execution are listed below.
The primary workflow commands are given first, followed by
less common or more advanced commands.


 2) powershell에서 작업


C:\ 경로에 terraform 폴더 생성 후 다운로드한 실행 파일 옮기기


환경 변수가 설정되지 않아 아래와 같은 에러를 확인할 수 있음


어디에서나 사용할 수 있도록 경로 설정 필요

내 PC > 속성 > 고급 시스템 설정 > 환경 변수 > Path > 편집 > C:\terraform; 추가


powershell 재실행하여 환경 변수가 제대로 적용되었는지 확인


추가: Vagrant를 이용한 terraform 설치


사전 작업: virtualbox와 vagrant 설치

베이그런트 코드 다운로드

https://github.com/wardviaene/devops-box


GitHub - wardviaene/devops-box: A vagrant project with an ubuntu box with the tools needed to do DevOps

A vagrant project with an ubuntu box with the tools needed to do DevOps - GitHub - wardviaene/devops-box: A vagrant project with an ubuntu box with the tools needed to do DevOps

github.com


C:\HashiCorp 경로에 다운로드한 파일 압축 풀기


vagrant up 실행

- 다운로드한 코드를 실행하여 소프트웨어 설치 (시간이 좀 걸림)

- 설치가 성공적으로 완료되면 가상 머신이 하나 생성되고 가상 머신에 베이그런트 우분투 이미지와 테라폼이 설치됨

C:\HashiCorp\devops-box-master>vagrant up

#  Successfully installed ...와 같은 문구가 보이면 설치가 성공적으로 된 것


윈도우 환경에서 virtualbox에 연결: vagrant ssh-config 또는 putty 사용

C:\HashiCorp\devops-box-master>vagrant ssh-config
Host devops-box
  HostName 127.0.0.1
  User vagrant
  Port 2222
  UserKnownHostsFile /dev/null
  StrictHostKeyChecking no
  PasswordAuthentication no
  IdentityFile C:/HashiCorp/devops-box-master/.vagrant/machines/devops-box/virtualbox/private_key
  IdentitiesOnly yes
  LogLevel FATAL
  
  C:\HashiCorp\devops-box-master>vagrant ssh
Welcome to Ubuntu 20.04.4 LTS (GNU/Linux 5.4.0-113-generic x86_64)

 * Documentation:  https://help.ubuntu.com
 * Management:     https://landscape.canonical.com
 * Support:        https://ubuntu.com/advantage

 System information disabled due to load higher than 2.0


1 update can be applied immediately.
To see these additional updates run: apt list --upgradable


vagrant@ubuntu-focal:~$


728x90

'Terraform' 카테고리의 다른 글

220613_1_테라폼_최신 버전 설치  (0) 2022.06.14
728x90

플레이북이란


- 사용자가 원하는 내용을 미리 정의해둔 것

- 작업 내용을 파일로 만들어 반복 실행하기

- 멱등성 성질을 가짐 (멱등성: 연산을 여러 번 적용하더라도 결과가 달라지지 않는 성질)

- YAML 언어를 사용함 (권장 에디터 툴: ATOM, Sublime Text 3)


  1) 멱등성이 적용되지 않은 경우

[root@Ansible-Server ~]# echo -e "[user01]\n172.30.1.13" >> /etc/ansible/hosts
[root@Ansible-Server ~]# echo -e "[user01]\n172.30.1.13" >> /etc/ansible/hosts

[root@Ansible-Server ~]# cat /etc/ansible/hosts
## db-[99:101]-node.example.com
...
[user01]
172.30.1.13
[user01]
172.30.1.13

# 실행한 만큼 적용됨


  2) 멱등성이 적용된 경우: 플레이북 적용

플레이북 생성

vi jin.yml

---
- name: Ansible_vim					# 파일 이름
  hosts: localhost					# 실행되는 곳

  tasks:							# 작업
    - name: Add ansible hosts		# 작업 이름
      blockinfile:					# 모듈 이름: 특정 블록을 파일이 기록
          path: /etc/ansible/hosts	# 기록할 위치
          block: |					# 블록을 기록할 시작 포인트
            [user01]
            172.30.1.13


플레이북 실행

[root@Ansible-Server ~]# ansible-playbook jin.yml

PLAY [Ansible_vim] ***********************************************************************

TASK [Gathering Facts] *******************************************************************
ok: [localhost]

TASK [Add ansible hosts] *****************************************************************
changed: [localhost]

PLAY RECAP *******************************************************************************
localhost                  : ok=2    changed=1    unreachable=0    failed=0    skipped=0    rescued=0    ignored=0

# 수정 사항이 없다는 내용
[root@Ansible-Server ~]# ansible-playbook jin.yml

PLAY [Ansible_vim] ***********************************************************************

TASK [Gathering Facts] *******************************************************************
ok: [localhost]

TASK [Add ansible hosts] *****************************************************************
ok: [localhost]

PLAY RECAP *******************************************************************************
localhost                  : ok=2    changed=0    unreachable=0    failed=0    skipped=0    rescued=0    ignored=0


멱등성 성질 확인: 여러 번 실행되더라도 같은 내용이라면 여러 번 기록되지 않음

[root@Ansible-Server ~]# cat /etc/ansible/hosts
...
## db-[99:101]-node.example.com
...
# BEGIN ANSIBLE MANAGED BLOCK
[user01]
172.30.1.13
# END ANSIBLE MANAGED BLOCK


플레이북 환경 설정


vim에 색 넣기


vim-plug 설치

웹 브라우저에서 ansible-vim 검색하여 접속 또는 아래 링크로 접속

https://github.com/pearofducks/ansible-vim


설치 안내 부분에서 vim-plug 클릭


해당 부분의 코드를 복사하여 실행


[root@Ansible-Server ~]# curl -fLo ~/.vim/autoload/plug.vim --create-dirs \
>     https://raw.githubusercontent.com/junegunn/vim-plug/master/plug.vim


ansible-vim 설치

~/.vimrc 생성

[root@Ansible-Server ~]# vi ~/.vimrc

call plug#begin()
Plug 'pearofducks/ansible-vim'
call plug#end()


패키지 설치

[root@Ansible-Server ~]# yum install -y vim-enhanced
[root@Ansible-Server ~]# yum install -y git


vim 설정

[root@Ansible-Server ~]# vim

# ansible-vim을 다운로드하여 설치 진행
:PlugInstall

# 설치가 완료되면 종료
:q
:q


vi 와 vim 모두 vim 호출되도록 설정

# bash 환경 파일 수정

[root@Ansible-Server ~]# vi ~/.bashrc
...
     14 alias vi='vim'
     
     
# 수정한 bash 파일을 적용하기 위해 환경 설정을 다시 불러옴
[root@Ansible-Server ~]# su -
Last login: Thu Jun  2 02:38:42 EDT 2022 from 172.30.1.46 on pts/0


색으로 구분하기 편하게 설정된 것을 확인할 수 있음


에러를 읽기 편하게 설정


설정 전 에러 확인


설정 파일 수정

# 주석 제거 후 skippy를 debug로 값 변경

[root@Ansible-Server ~]# vi /etc/ansible/ansible.cfg

 74 stdout_callback = debug


정렬된 에러 확인


플레이북 실습


플레이북을 통해 3대의 노드들에 웹 서비스 설치 및 실행


nginx.yml 플레이북 생성 및 실행

[root@Ansible-Server ~]# vi nginx.yml
---
- hosts: nginx
  remote_user: root
  tasks:
    - name: install epel-release
      yum: name=epel-release state=latest
    - name: install nginx web server
      yum: name=nginx state=present
    - name: Start nginx web server
      service: name=nginx state=started

[root@Ansible-Server ~]# ansible-playbook nginx.yml -k
SSH password:


방화벽 설정

- 플레이북 실행 후 서비스는 실행되고 있지만 방화벽 설정이 되어있지 않아 웹 브라우저에서 접속이 불가함

[root@Ansible-Server ~]# ansible nginx -m shell -a "systemctl stop firewalld" -k
SSH password:
172.30.1.13 | CHANGED | rc=0 >>

172.30.1.12 | CHANGED | rc=0 >>

172.30.1.11 | CHANGED | rc=0 >>


웹 브라우저에서 접속하여 nginx 기본 페이지 확인

172.30.1.11

172.30.1.12

172.30.1.13


nginx 기본 페이지 변경

  1) index.html 파일 다운로드

# 변경할 index.html 파일 다운로드
[root@Ansible-Server ~]# curl -o index.html https://www.nginx.com
  % Total    % Received % Xferd  Average Speed   Time    Time     Time  Current
                                 Dload  Upload   Total   Spent    Left  Speed
100  397k    0  397k    0     0   228k      0 --:--:--  0:00:01 --:--:--  228k
[root@Ansible-Server ~]# ls -rlt
total 408
-rw-------. 1 root root   1214 Jun  1 23:45 anaconda-ks.cfg
-rw-r--r--. 1 root root    271 Jun  2 05:00 nginx.yml
-rw-r--r--. 1 root root 406732 Jun  2 05:10 index.html


  2) 플레이북 수정

[root@Ansible-Server ~]# vi nginx.yml
---
- hosts: nginx			# nginx 대신 all 사용 가능 (all 사용 시 /etc/ansible/hosts의 호스트를 대상으로 함)
  remote_user: root
  tasks:
    - name: install epel-release
      yum: name=epel-release state=latest
    - name: install nginx web server
      yum: name=nginx state=present
    - name: Upload default index.html for web server
      copy: src=index.html dest=/usr/share/nginx/html/ mode=0644	# mode: 보안을 위한 설정
    - name: Start nginx web server
      service: name=nginx state=started


  3) 플레이북 실행

[root@Ansible-Server ~]# ansible-playbook nginx.yml -k


변경된 nginx 페이지 확인


172.30.1.11 접속


172.30.1.12 접속


172.30.1.13 접속


728x90
728x90

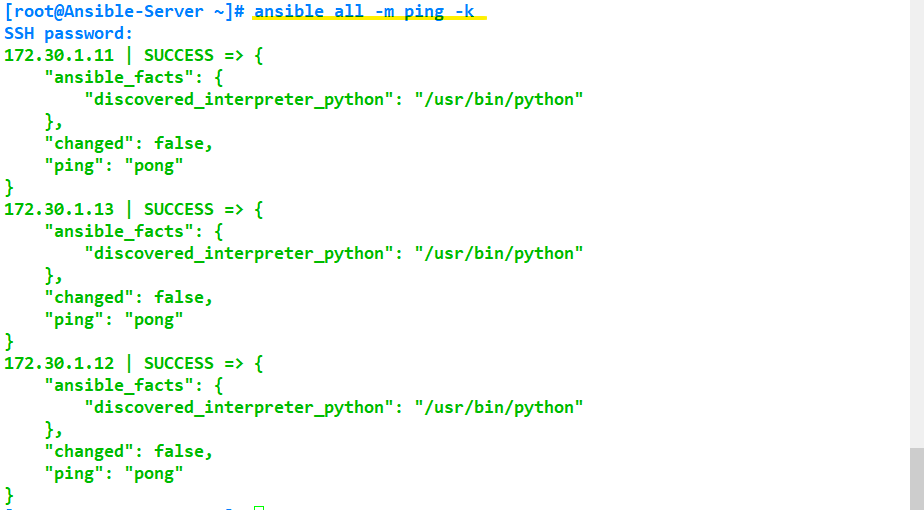
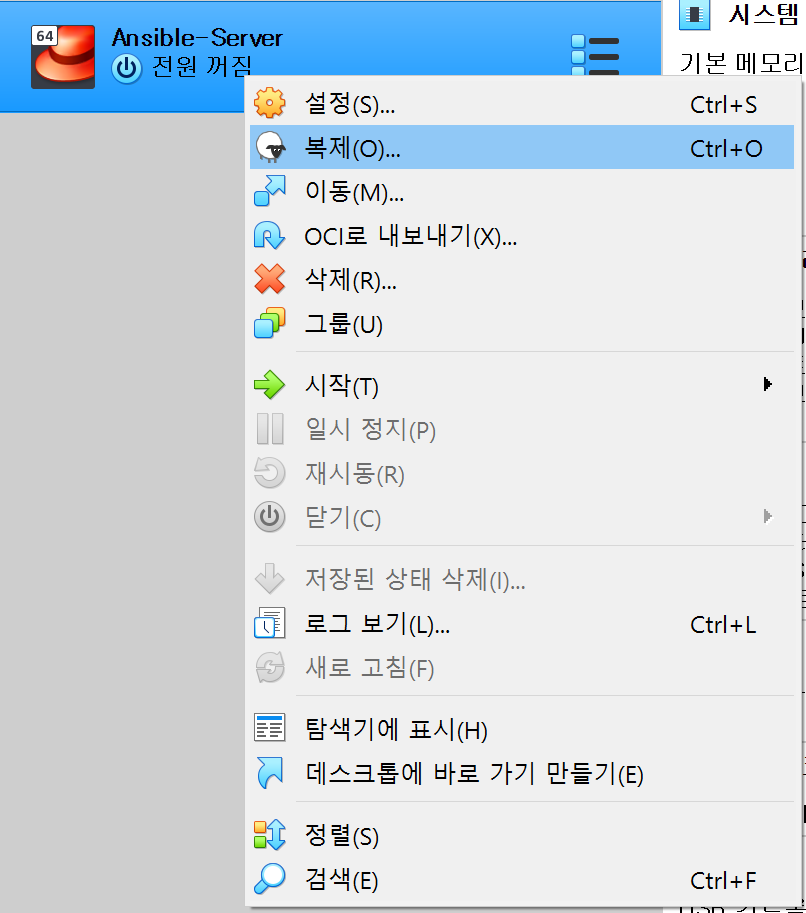
한 번의 명령어로 다수의 시스템에 작업하기


uptime 확인

[root@Ansible-Server ~]# ansible all -m shell -a "uptime" -k
SSH password:
172.30.1.13 | CHANGED | rc=0 >>
 04:07:56 up  2:57,  2 users,  load average: 0.00, 0.01, 0.04
172.30.1.11 | CHANGED | rc=0 >>
 04:07:56 up  2:57,  2 users,  load average: 0.00, 0.01, 0.03
172.30.1.12 | CHANGED | rc=0 >>
 04:07:57 up  2:57,  2 users,  load average: 0.08, 0.03, 0.05


디스크 용량 확인

[root@Ansible-Server ~]# ansible all -m shell -a "df -h"
172.30.1.11 | CHANGED | rc=0 >>
Filesystem               Size  Used Avail Use% Mounted on
devtmpfs                 484M     0  484M   0% /dev
tmpfs                    496M     0  496M   0% /dev/shm
tmpfs                    496M  6.8M  489M   2% /run
tmpfs                    496M     0  496M   0% /sys/fs/cgroup
/dev/mapper/centos-root   50G  1.3G   49G   3% /
/dev/sda1               1014M  138M  877M  14% /boot
/dev/mapper/centos-home  2.0T   33M  2.0T   1% /home
tmpfs                    100M     0  100M   0% /run/user/0
172.30.1.12 | CHANGED | rc=0 >>
Filesystem               Size  Used Avail Use% Mounted on
devtmpfs                 484M     0  484M   0% /dev
tmpfs                    496M     0  496M   0% /dev/shm
tmpfs                    496M  6.8M  489M   2% /run
tmpfs                    496M     0  496M   0% /sys/fs/cgroup
/dev/mapper/centos-root   50G  1.3G   49G   3% /
/dev/sda1               1014M  138M  877M  14% /boot
/dev/mapper/centos-home  2.0T   33M  2.0T   1% /home
tmpfs                    100M     0  100M   0% /run/user/0
172.30.1.13 | CHANGED | rc=0 >>
Filesystem               Size  Used Avail Use% Mounted on
devtmpfs                 484M     0  484M   0% /dev
tmpfs                    496M     0  496M   0% /dev/shm
tmpfs                    496M  6.8M  489M   2% /run
tmpfs                    496M     0  496M   0% /sys/fs/cgroup
/dev/mapper/centos-root   50G  1.3G   49G   3% /
/dev/mapper/centos-home  2.0T   33M  2.0T   1% /home
/dev/sda1               1014M  138M  877M  14% /boot
tmpfs                    100M     0  100M   0% /run/user/0


메모리 상태 확인

[root@Ansible-Server ~]# ansible all -m shell -a "free -h" -k
SSH password:
172.30.1.12 | CHANGED | rc=0 >>
              total        used        free      shared  buff/cache   available
Mem:           990M        165M        706M        6.8M        119M        693M
Swap:          2.0G          0B        2.0G
172.30.1.13 | CHANGED | rc=0 >>
              total        used        free      shared  buff/cache   available
Mem:           990M        163M        708M        6.8M        119M        694M
Swap:          2.0G          0B        2.0G
172.30.1.11 | CHANGED | rc=0 >>
              total        used        free      shared  buff/cache   available
Mem:           990M        164M        706M        6.8M        119M        693M
Swap:          2.0G          0B        2.0G


새로운 유저 생성

[root@Ansible-Server ~]# ansible all -m user -a "name=user01 password=1234" -k
SSH password:
[WARNING]: The input password appears not to have been hashed. The 'password' argument
must be encrypted for this module to work properly.
172.30.1.12 | CHANGED => {
    "ansible_facts": {
        "discovered_interpreter_python": "/usr/bin/python"
    },
    "changed": true,
    "comment": "",
    "create_home": true,
    "group": 1000,
    "home": "/home/user01",
    "name": "user01",
    "password": "NOT_LOGGING_PASSWORD",
    "shell": "/bin/bash",
    "state": "present",
    "system": false,
    "uid": 1000
}
172.30.1.13 | CHANGED => {
    "ansible_facts": {
        "discovered_interpreter_python": "/usr/bin/python"
    },
    "changed": true,
    "comment": "",
    "create_home": true,
    "group": 1000,
    "home": "/home/user01",
    "name": "user01",
    "password": "NOT_LOGGING_PASSWORD",
    "shell": "/bin/bash",
    "state": "present",
    "system": false,
    "uid": 1000
}
172.30.1.11 | CHANGED => {
    "ansible_facts": {
        "discovered_interpreter_python": "/usr/bin/python"
    },
    "changed": true,
    "comment": "",
    "create_home": true,
    "group": 1000,
    "home": "/home/user01",
    "name": "user01",
    "password": "NOT_LOGGING_PASSWORD",
    "shell": "/bin/bash",
    "state": "present",
    "system": false,
    "uid": 1000
}


ansible-node01에 접속하여 user01 사용자가 생성되었는지 확인

[root@Ansible-Server ~]# ssh root@172.30.1.11

[root@ansible-node01 ~]# cat /etc/passwd
...
user01:x:1000:1000::/home/user01:/bin/bash


파일 전송

파일을 하나 생성하여 관리되고 있는 노드들에 모두 전송

# 노드들에 전송할 파일 생성: jin.file
[root@Ansible-Server ~]# ls -rlt
total 8
-rw-------. 1 root root 1214 Jun  1 23:45 anaconda-ks.cfg
-rw-r--r--. 1 root root   24 Jun  2 03:43 test
[root@Ansible-Server ~]# touch jin.file
[root@Ansible-Server ~]# ls -rlt
total 8
-rw-------. 1 root root 1214 Jun  1 23:45 anaconda-ks.cfg
-rw-r--r--. 1 root root   24 Jun  2 03:43 test
-rw-r--r--. 1 root root    0 Jun  2 04:15 jin.file


# nginx에 속한 노드들의 /tmp 경로로 jin.file을 복사하겠다

[root@Ansible-Server ~]# ansible nginx -m copy -a "src=./jin.file dest=/tmp/" -k
SSH password:
172.30.1.11 | CHANGED => {
    "ansible_facts": {
        "discovered_interpreter_python": "/usr/bin/python"
    },
    "changed": true,
    "checksum": "da39a3ee5e6b4b0d3255bfef95601890afd80709",
    "dest": "/tmp/jin.file",
    "gid": 0,
    "group": "root",
    "md5sum": "d41d8cd98f00b204e9800998ecf8427e",
    "mode": "0644",
    "owner": "root",
    "secontext": "unconfined_u:object_r:admin_home_t:s0",
    "size": 0,
    "src": "/root/.ansible/tmp/ansible-tmp-1654157890.28-10394-49655578753014/source",
    "state": "file",
    "uid": 0
}
172.30.1.12 | CHANGED => {
    "ansible_facts": {
        "discovered_interpreter_python": "/usr/bin/python"
    },
    "changed": true,
    "checksum": "da39a3ee5e6b4b0d3255bfef95601890afd80709",
    "dest": "/tmp/jin.file",
    "gid": 0,
    "group": "root",
    "md5sum": "d41d8cd98f00b204e9800998ecf8427e",
    "mode": "0644",
    "owner": "root",
    "secontext": "unconfined_u:object_r:admin_home_t:s0",
    "size": 0,
    "src": "/root/.ansible/tmp/ansible-tmp-1654157890.29-10395-66125307720210/source",
    "state": "file",
    "uid": 0
}
172.30.1.13 | CHANGED => {
    "ansible_facts": {
        "discovered_interpreter_python": "/usr/bin/python"
    },
    "changed": true,
    "checksum": "da39a3ee5e6b4b0d3255bfef95601890afd80709",
    "dest": "/tmp/jin.file",
    "gid": 0,
    "group": "root",
    "md5sum": "d41d8cd98f00b204e9800998ecf8427e",
    "mode": "0644",
    "owner": "root",
    "secontext": "unconfined_u:object_r:admin_home_t:s0",
    "size": 0,
    "src": "/root/.ansible/tmp/ansible-tmp-1654157890.32-10396-93284678817142/source",
    "state": "file",
    "uid": 0
}


전송된 파일 확인

[root@Ansible-Server ~]# ssh root@172.30.1.11
root@172.30.1.11's password:
Last login: Thu Jun  2 04:18:11 2022 from 172.30.1.10
[root@ansible-node01 ~]# ls -rlt /tmp
total 4
...
-rw-r--r--. 1 root root   0 Jun  2 04:18 jin.file


서비스 설치

노드들에 아파치를 설치하도록 명령 실행

에러 발생: 각 노드들에 DNS 설정이 되어있지 않기 때문

[root@Ansible-Server ~]# ansible nginx -m yum -a "name=httpd state=present" -k
SSH password:
172.30.1.11 | FAILED! => {
    "ansible_facts": {
        "discovered_interpreter_python": "/usr/bin/python"
    },
    "changed": false,
    "msg": "Failure talking to yum: Cannot find a valid baseurl for repo: base/7/x86_64"
}
172.30.1.13 | FAILED! => {
    "ansible_facts": {
        "discovered_interpreter_python": "/usr/bin/python"
    },
    "changed": false,
    "msg": "Failure talking to yum: Cannot find a valid baseurl for repo: base/7/x86_64"
}
172.30.1.12 | FAILED! => {
    "ansible_facts": {
        "discovered_interpreter_python": "/usr/bin/python"
    },
    "changed": false,
    "msg": "Failure talking to yum: Cannot find a valid baseurl for repo: base/7/x86_64"
}


에러 해결: ansible-server에 있는 DNS 설정 파일을 각 노드로 복사

[root@Ansible-Server ~]# ansible nginx -m copy -a "src=/etc/resolv.conf dest=/etc/resolv.conf" -k


다시 설치 명령 실행

[root@Ansible-Server ~]# ansible nginx -m yum -a "name=httpd state=present" -k


ansible-node01에 접속하여 설치 확인

[root@Ansible-Server ~]# ssh root@172.30.1.11
root@172.30.1.11's password:
Last login: Thu Jun  2 04:26:05 2022 from 172.30.1.10
[root@ansible-node01 ~]# yum list installed | grep httpd
httpd.x86_64                          2.4.6-97.el7.centos.5            @updates
httpd-tools.x86_64                    2.4.6-97.el7.centos.5            @updates

# 설치가 완료되었지만 실행은 되지 않음
[root@ansible-node01 ~]# systemctl status httpd
● httpd.service - The Apache HTTP Server
   Loaded: loaded (/usr/lib/systemd/system/httpd.service; disabled; vendor preset: disabled)
   Active: inactive (dead)
     Docs: man:httpd(8)
           man:apachectl(8)
728x90
728x90

앤서블 기본 구성 요소


1. /etc/ansible/ansible.cfg

- 환경 설정 파일


2. /etc/ansible/hosts

- 앤서블이 접속하는 호스트들에 대한 정보


3. 옵션 값


옵션 설명
-i (--inventory-file) 적용될 호스트들에 대한 파일
-m (--module-name) 모듈을 선택할 수 있도록
-k (--ask-pass) 패스워드를 물어보도록 설정
-K (--ask-become-pass) 관리자로 권한 상승
--list-hosts 적용되는 호스트들 확인


-i : 특정 노드들에 대해 명령어 실행을 원할 경우 자유로운 인벤토리 사용 가능

 1) 임의의 파일: test

# 테스트를 위해 test 파일 생성
[root@Ansible-Server ~]# vi test
      1 172.30.1.11
      2 172.30.1.12
    
# test 파일에 입력한 두 개의 노드에 대해서만 통신    
[root@Ansible-Server ~]# ansible all -i test -m ping -k
SSH password:
172.30.1.11 | SUCCESS => {
    "ansible_facts": {
        "discovered_interpreter_python": "/usr/bin/python"
    },
    "changed": false,
    "ping": "pong"
}
172.30.1.12 | SUCCESS => {
    "ansible_facts": {
        "discovered_interpreter_python": "/usr/bin/python"
    },
    "changed": false,
    "ping": "pong"
}


 2) /etc/ansible/hosts 파일

# /etc/ansible/hosts 파일 설정
     43 ## db-[99:101]-node.example.com
     44 [nginx] # 그룹 이름과 같은 역할
     45 172.30.1.11
     46 172.30.1.12
     47 172.30.1.13

# nginx에 해당하는 노드들에 명령어 적용
[root@Ansible-Server ~]# ansible nginx -m ping -k
SSH password:
172.30.1.11 | SUCCESS => {
    "ansible_facts": {
        "discovered_interpreter_python": "/usr/bin/python"
    },
    "changed": false,
    "ping": "pong"
}
172.30.1.12 | SUCCESS => {
    "ansible_facts": {
        "discovered_interpreter_python": "/usr/bin/python"
    },
    "changed": false,
    "ping": "pong"
}
172.30.1.13 | SUCCESS => {
    "ansible_facts": {
        "discovered_interpreter_python": "/usr/bin/python"
    },
    "changed": false,
    "ping": "pong"
}


-k: 해당 옵션이 없으면 퍼블릭 키 교환이 이루어지지 않아 로그인을 할 수 없음

[root@Ansible-Server ~]# ansible nginx -m ping
172.30.1.11 | UNREACHABLE! => {
    "changed": false,
    "msg": "Failed to connect to the host via ssh: Permission denied (publickey,gssapi-keyex,gssapi-with-mic,password).",
    "unreachable": true
}
172.30.1.12 | UNREACHABLE! => {
    "changed": false,
    "msg": "Failed to connect to the host via ssh: Permission denied (publickey,gssapi-keyex,gssapi-with-mic,password).",
    "unreachable": true
}
172.30.1.13 | UNREACHABLE! => {
    "changed": false,
    "msg": "Failed to connect to the host via ssh: Permission denied (publickey,gssapi-keyex,gssapi-with-mic,password).",
    "unreachable": true
}


-K: 루트 사용자 권한을 가져옴

[root@Ansible-Server ~]# ansible nginx -m ping -k -K
SSH password:
BECOME password[defaults to SSH password]:
172.30.1.11 | SUCCESS => {
    "ansible_facts": {
        "discovered_interpreter_python": "/usr/bin/python"
    },
    "changed": false,
    "ping": "pong"
}
172.30.1.12 | SUCCESS => {
    "ansible_facts": {
        "discovered_interpreter_python": "/usr/bin/python"
    },
    "changed": false,
    "ping": "pong"
}
172.30.1.13 | SUCCESS => {
    "ansible_facts": {
        "discovered_interpreter_python": "/usr/bin/python"
    },
    "changed": false,
    "ping": "pong"
}


--list-hosts

# /etc/ansible/hosts 파일에 설정된 호스트
[root@Ansible-Server ~]# ansible nginx -m ping --list-hosts
  hosts (3):
    172.30.1.11
    172.30.1.12
    172.30.1.13

# test 파일에 설정된 호스트
[root@Ansible-Server ~]# ansible all -i test -m ping --list-hosts
  hosts (2):
    172.30.1.11
    172.30.1.12


Ansible-Server에 앤서블 코어 설치


ansible 설치

에러 확인: dns 서버가 설정되지 않아 발생


[root@Ansible-Server ~]# yum install -y ansible
Loaded plugins: fastestmirror
Determining fastest mirrors
Could not retrieve mirrorlist http://mirrorlist.centos.org/?release=7&arch=x86_64&repo=os&infra=stock error was
14: curl#6 - "Could not resolve host: mirrorlist.centos.org; Unknown error"


 One of the configured repositories failed (Unknown),
 and yum doesn't have enough cached data to continue. At this point the only
 safe thing yum can do is fail. There are a few ways to work "fix" this:

     1. Contact the upstream for the repository and get them to fix the problem.

     2. Reconfigure the baseurl/etc. for the repository, to point to a working
        upstream. This is most often useful if you are using a newer
        distribution release than is supported by the repository (and the
        packages for the previous distribution release still work).

     3. Run the command with the repository temporarily disabled
            yum --disablerepo=<repoid> ...

     4. Disable the repository permanently, so yum won't use it by default. Yum
        will then just ignore the repository until you permanently enable it
        again or use --enablerepo for temporary usage:

            yum-config-manager --disable <repoid>
        or
            subscription-manager repos --disable=<repoid>

     5. Configure the failing repository to be skipped, if it is unavailable.
        Note that yum will try to contact the repo. when it runs most commands,
        so will have to try and fail each time (and thus. yum will be be much
        slower). If it is a very temporary problem though, this is often a nice
        compromise:

            yum-config-manager --save --setopt=<repoid>.skip_if_unavailable=true

Cannot find a valid baseurl for repo: base/7/x86_64


해결: DNS 서버 설정


[root@Ansible-Server ~]# vi /etc/resolv.conf

nameserver 168.126.63.1


DNS 서버가 제대로 설정되었는지 확인

[root@Ansible-Server ~]# ping google.com
PING google.com (172.217.175.46) 56(84) bytes of data.
64 bytes from nrt20s19-in-f14.1e100.net (172.217.175.46): icmp_seq=1 ttl=114 time=32.0 ms
64 bytes from nrt20s19-in-f14.1e100.net (172.217.175.46): icmp_seq=2 ttl=114 time=31.9 ms


레포지토리 리스트 확인

- 앤서블 설치 패키지가 없기 때문에 앤서블 설치 시 에러 발생


[root@Ansible-Server ~]# yum repolist

repo id                             repo name                             status
base/7/x86_64                       CentOS-7 - Base                       10,072
extras/7/x86_64                     CentOS-7 - Extras                        512
updates/7/x86_64                    CentOS-7 - Updates                     3,842
repolist: 14,426


앤서블 설치 패키지를 다운로드할 수 있는 공간 설정

# epel 패키지 설치
[root@Ansible-Server ~]# yum install -y epel-release


앤서블 설치 패키지 다운로드 및 확인

# ansible 패키지 설치
[root@Ansible-Server ~]# yum install -y ansible

# ansible 명령어 확인
[root@Ansible-Server ~]# ansible
usage: ansible [-h] [--version] [-v] [-b] [--become-method BECOME_METHOD]
               [--become-user BECOME_USER] [-K] [-i INVENTORY] [--list-hosts]
               [-l SUBSET] [-P POLL_INTERVAL] [-B SECONDS] [-o] [-t TREE] [-k]
               [--private-key PRIVATE_KEY_FILE] [-u REMOTE_USER]
               [-c CONNECTION] [-T TIMEOUT]
               [--ssh-common-args SSH_COMMON_ARGS]
               [--sftp-extra-args SFTP_EXTRA_ARGS]
               [--scp-extra-args SCP_EXTRA_ARGS]
               [--ssh-extra-args SSH_EXTRA_ARGS] [-C] [--syntax-check] [-D]
               [-e EXTRA_VARS] [--vault-id VAULT_IDS]
               [--ask-vault-pass | --vault-password-file VAULT_PASSWORD_FILES]
               [-f FORKS] [-M MODULE_PATH] [--playbook-dir BASEDIR]
               [-a MODULE_ARGS] [-m MODULE_NAME]
               pattern
ansible: error: too few arguments


통신 확인

앤서블 명령어 입력 시 호스트 리스트가 비어있다는 에러 확인

[root@Ansible-Server ~]# ansible all -m ping -k
SSH password:
[WARNING]: provided hosts list is empty, only localhost is available. Note that
the implicit localhost does not match 'all'


/etc/ansible/hosts 파일에 ansible 노드들의 IP 주소 입력

[root@Ansible-Server ~]# vi /etc/ansible/hosts


     43 ## db-[99:101]-node.example.com
     44 [nginx] # 그룹 이름과 같은 역할
     45 172.30.1.11
     46 172.30.1.12
     47 172.30.1.13


ansible all -m ping 명령어 입력 후 퍼블릭 키 교환을 위해 yes 입력

[root@Ansible-Server ~]# ansible all -m ping

The authenticity of host '172.30.1.12 (172.30.1.12)' can't be established.
ECDSA key fingerprint is SHA256:eh7uTCrpcvLAs0DeHsU/ue9UXGxxjaqudmhQVhg0juI.
ECDSA key fingerprint is MD5:e1:59:5e:93:ba:f3:ef:2a:c6:6b:8a:56:b9:90:62:cd.
Are you sure you want to continue connecting (yes/no)? The authenticity of host '172.30.1.13 (172.30.1.13)' can't be established.
ECDSA key fingerprint is SHA256:eh7uTCrpcvLAs0DeHsU/ue9UXGxxjaqudmhQVhg0juI.
ECDSA key fingerprint is MD5:e1:59:5e:93:ba:f3:ef:2a:c6:6b:8a:56:b9:90:62:cd.
Are you sure you want to continue connecting (yes/no)? The authenticity of host '172.30.1.11 (172.30.1.11)' can't be established.
ECDSA key fingerprint is SHA256:eh7uTCrpcvLAs0DeHsU/ue9UXGxxjaqudmhQVhg0juI.
ECDSA key fingerprint is MD5:e1:59:5e:93:ba:f3:ef:2a:c6:6b:8a:56:b9:90:62:cd.
Are you sure you want to continue connecting (yes/no)? yes
172.30.1.12 | UNREACHABLE! => {
    "changed": false,
    "msg": "Failed to connect to the host via ssh: Warning: Permanently added '172.30.1.12' (ECDSA) to the list of known hosts.\r\nPermission denied (publickey,gssapi-keyex,gssapi-with-mic,password).",
    "unreachable": true
}
yes
172.30.1.13 | UNREACHABLE! => {
    "changed": false,
    "msg": "Failed to connect to the host via ssh: Warning: Permanently added '172.30.1.13' (ECDSA) to the list of known hosts.\r\nPermission denied (publickey,gssapi-keyex,gssapi-with-mic,password).",
    "unreachable": true
}
yes
172.30.1.11 | UNREACHABLE! => {
    "changed": false,
    "msg": "Failed to connect to the host via ssh: Warning: Permanently added '172.30.1.11' (ECDSA) to the list of known hosts.\r\nPermission denied (publickey,gssapi-keyex,gssapi-with-mic,password).",
    "unreachable": true
}


퍼블릭 키 교환이 완료되어 노드들과 정상적으로 통신이 되었음을 확인 

[root@Ansible-Server ~]# ansible all -m ping -k
SSH password: #1234
172.30.1.11 | SUCCESS => {
    "ansible_facts": {
        "discovered_interpreter_python": "/usr/bin/python"
    },
    "changed": false,
    "ping": "pong"
}
172.30.1.13 | SUCCESS => {
    "ansible_facts": {
        "discovered_interpreter_python": "/usr/bin/python"
    },
    "changed": false,
    "ping": "pong"
}
172.30.1.12 | SUCCESS => {
    "ansible_facts": {
        "discovered_interpreter_python": "/usr/bin/python"
    },
    "changed": false,
    "ping": "pong"
}

728x90
728x90

실습 환경 구성


아키텍처


Host Name Ansible-Server Ansible-Node01 Ansible-Node02 Ansible-Node03
IPv4(enp0s3) 172.30.1.10 172.30.1.11 172.30.1.12 172.30.1.13
SubnetMask 255.255.255.0
Gateway 172.30.1.254


가상 머신 구성


가상 머신 생성


최댓값으로 설정


가상머신 설정

저장소: 이미지 파일 추가


네트워크 설정: 브릿지 어댑터로 변경


CentOS 7 설치


KDUMP

KDUMP: 용량 확보를 위해서 꺼줌


INSTALLATION DESTINATION

기본 옵션 그대로 사용


NETWORK & HOST NAME

호스트 네임 변경: Ansible-Server


ROOT PASSWORD

루트 암호: 1234


가상 머신 복제, 호스트 네임 및 IP 설정

IP 확인: ip add

브릿지 어댑터로 설정했기 때문에 IP를 할당받지 않음


가상 머신 종료: poweroff


가상 머신 복제(node01, node02, node03)

모든 네트워크 어댑터의 새 MAC 주소 생성: 충돌 방지

완전한 복제: 완전한 복제를 해야 두 개가 분리되어 복제됨


호스트 네임 설정

# 각 머신에서 호스트 네임설정
hostnamectl set-hostname Ansible-Node01
hostnamectl set-hostname Ansible-Node02
hostnamectl set-hostname Ansible-Node03


IP 할당

어댑터에 브릿지: 공유기에서 IP를 바로 할당받음

가상 머신의 네트워크 카드가 브릿지 어댑터로 호스트 PC의 IP 주소 확인 필요

호스트 PC의 IP 확인: 윈도우 키 + R > cmd 창: ipconfig

이더넷 어댑터 이더넷 IP 주소와 이더넷 어댑터 VirtualBox Host-Only Network 주소 확인


nmtui 명령어로 네트워크 IP 설정

nmtui > enp0s3 > IPv4 Configuration: Manual > Addresses: 172.30.1.10/24 > Gateway: 172.30.1.254

Automatically connect: 자동으로 연결 설정


Ansible-Server
Ansible-Node01
Ansible-Node02
Ansible-Node03


IP 설정 확인

# 네트워크 서비스 재시작
systemctl restart network

# 게이트웨이와 통신이 잘되는지 확인
ping 172.30.1.254

# 설정된 IP 주소 확인
ip add


728x90
728x90

인터페이스 이중화


- 기존에는 하나의 인터페이스에 하나의 IP 주소 할당 및 사용

- 인터페이스 문제 발생 시 서비스 제공에 지장

- 인터페이스마다 주소가 다르면 접근이 어려움

- 인터페이스 여러 개를 묶어서 사용하는 형태 ===> 본딩 / 티밍 두 가지 방식 존재


네트워크 티밍


티밍이란?

- RHEL7 버전부터 제공 (기존의 본딩 방식에서 변경 가능)

- 본딩에 비해 사용자(관리자) 입장에서 편의성 제공

- 인터페이스 장애에 대한 대비

- 효율성 증대

- IP 주소에 대한 부담 감소

- 여러 개의 인터페이스에 대해 IP 주소를 하나만 설정

- 목적:  인터페이스에 문제가 발생하더라도 네트워크가 끊어지지 않도록 하기위함


러너

- 티밍 구성 시 동작 방식 지정 (트래픽 처리 방식)

- 러너 방식

러너 설명
broadcast 각각의 인터페이스마다 패킷 전달
roundrobin
하나씩 번갈아가면서 패킷 전달
loadbalance 처리량(상태)에 따라 부하분산 기능 제공
active-backup 장애 복구 방식의 기능만 제공
LACP 네트워크 장비(스위치)에서 설정해둔 방식으로 동작


인터페이스 준비


NAT 네트워크 카드 두 개 설정

> 가상 머신 전원 끄기

> 가상 머신 속성

> 네트워크

> 어댑터 총 3개 설정: NAT 네트워크 2개, 호스트 전용 어댑터 1개


인터페이스 아키텍처


- 팀 인터페이스를 활성화하더라도 포트 인터페이스는 활성화되지 않음

- 포트 인터페이스 활성화 시 팀 인터페이스 자동 활성화

- 포트 인터페이스 비활성화 시 팀 인터페이스 활성화 유지

- 팀 인터페이스 비활성화 시 모든 포트 인터페이스 비활성화


인터페이스 설정


NAT 네트워크 비활성화 (enp0s3, enp0s9)

# 연결된 인터페이스 확인

[root@team ~]# nmcli c s
NAME                UUID                                  TYPE      DEVICE
Wired connection 1  a97fc47b-0dd9-3d92-a146-17b8947a836c  ethernet  enp0s9
enp0s8              12fddb3e-080a-4945-9673-80141255a31b  ethernet  enp0s8
virbr0              c1ec0042-e850-4398-8e21-7411149e676d  bridge    virbr0
enp0s3              f093169b-ee0b-4740-9f54-4056c6c3d1bf  ethernet  --

# NAT 네트워크 비활성화
[root@team ~]# nmcli con down enp0s3
[root@team ~]# nmcli con down Wired connection 1

# 인터페이스 상태 확인
[root@team ~]# nmcli dev status
DEVICE      TYPE      STATE         CONNECTION
enp0s8      ethernet  connected     enp0s8
virbr0      bridge    connected     virbr0
enp0s3      ethernet  disconnected  --
enp0s9      ethernet  disconnected  --
lo          loopback  unmanaged     --
virbr0-nic  tun       unmanaged     --


팀 인터페이스 생성 (team01: 가상 인터페이스)

# type: team / team-slave

 1) team: 팀 인터페이스

 2) team-slave: 포트 인터페이스


# config: 러너 방식 (json 문법)

***작성 시 주의: 입력 시 오타에 대한 오류가 발생하지 않음


[root@team ~]# nmcli connection add type team con-name team01 ifname team01 config '{"runner": {"name": "activebackup"}}'
Connection 'team01' (7cbad7b0-7802-4fe1-b1d8-1c561d42059e) successfully added.


team01 가상 인터페이스는 생성되었으나 실제 IP 주소가 할당되지 않은 상태


생성한 팀 인터페이스에 IP 주소 정적 할당

[root@team ~]# nmcli con mod team01 ipv4.addresses 10.0.2.110/24
[root@team ~]# nmcli con mod team01 ipv4.gateway 10.0.2.1
[root@team ~]# nmcli con mod team01 ipv4.dns 8.8.8.8
[root@team ~]# nmcli con mod team01 ipv4.method manual
[root@team ~]# nmcli con up team01
Connection successfully activated (master waiting for slaves) (D-Bus active path: /org/freedesktop/NetworkManager/ActiveConnection/14)

[root@team ~]# teamdctl team01 state
...
ipv4.method:                            manual
ipv4.dns:                               8.8.8.8
ipv4.dns-search:                        --
ipv4.dns-options:                       ""
ipv4.dns-priority:                      0
ipv4.addresses:                         10.0.2.110/24
ipv4.gateway:                           10.0.2.1
...


포트 인터페이스 생성 (team01-port1, team01-port2: 물리 인터페이스)

-> DHCP 서버에서 IP 주소를 할당받음


[root@team ~]# nmcli connection add type team-slave con-name team01-port1 ifname enp0s3 master team01
Connection 'team01-port1' (217bee6c-051c-4eaf-868a-04843ff07741) successfully added.

[root@team ~]# nmcli connection add type team-slave con-name team01-port2 ifname enp0s9 master team01
Connection 'team01-port2' (042b8ca2-9fbf-4506-8295-cd4751098371) successfully added.


팀/포트 인터페이스 활성화

*** 팀 인터페이스 활성화를 위해서는 반드시 포트 인터페이스 활성화 필요


[root@team ~]# nmcli con up team01-port1
Connection successfully activated (D-Bus active path: /org/freedesktop/NetworkManager/ActiveConnection/13)

[root@team ~]# nmcli con up team01-port2
Connection successfully activated (D-Bus active path: /org/freedesktop/NetworkManager/ActiveConnection/12)

[root@team ~]# nmcli con up team01
Connection successfully activated (master waiting for slaves) (D-Bus active path: /org/freedesktop/NetworkManager/ActiveConnection/8)


참고: 설정한 러너 변경

1) nmcli con mod team01 team.config '{"runner .... 

2) 별도의 json 형태의 파일을 이용 가능

-> nmcli con mod team01 team.config FILE

/usr/share/doc/team-XXX/example_configs/ 에서 참고

nmcli con mod team01 team.config '{"runner": {"name": "roundrobin"}}'


728x90
728x90

이전 실습에 이어 구성

/etc/haproxy/haproxy.cfg 파일 수정

tcp 모드로 설정해야 http, mysql 동시 구성 가능

[root@haproxy ~]# vi /etc/haproxy/haproxy.cfg
      4         pidfile         /var/run/haproxy.pid
      5         maxconn         255
      6         user            haproxy
      7         group           haproxy
      8         daemon
      9
     10 defaults
     11         mode            tcp
     12         log             global
     13         timeout connect 30s
     14         timeout server  60s
     15         timeout client  60s
     16
     17 frontend        loadbalancer_db
     18         bind *:3306
     19         default_backend mariadb
     20
     21 backend mariadb
     22         balance roundrobin
     23         server  db01    10.0.2.10:3306  check
     24         server  db02    10.0.2.20:3306  check
     25
     26
     27 frontend        loadbalancer_web
     28         bind *:80
     29         default_backend web
     30
     31 backend web
     32         balance roundrobin
     33         server  web01    10.0.2.30:80  check
     34         server  web02    10.0.2.31:80  check


로드밸런서에서 작동 확인


* 주의

tcp 동작 모드로 할 경우 웹 서버의 로드밸런싱 속도가 느려짐

http 동작 모드로 변경하면 정상 속도로 돌아옴

728x90
728x90

L4 로드밸런서 구성


L4 로드밸런서로 MariaDB 로드밸런싱 구성

- HAProxy 에서 기본 방식은 http/https 로드밸런서 기능 (L7)
- 데이터베이스와 같은 서비스들도 로드밸런서가 필요할 수 있음
- L4 로드밸런서를 이용해서 부하분산 지원
- TCP/UDP 각 포트 번호에 따라 부하분산 설정 가능


DB 서버 구성


패키지 설치 및 기본 보안 설정

yum install -y mariadb-server

systemctl enable --now mariadb

mysql_secure_installation


사용자 및 테이블 구성

DB 1

# 사용자 권한 설정
MariaDB [(none)]> GRANT select,insert ON *.* TO remote@'%' identified by '123';
MariaDB [(none)]> flush privileges;

# 데이터베이스 설정
MariaDB [(none)]> CREATE database examdb;
MariaDB [(none)]> use examdb;
MariaDB [examdb]> CREATE table test_tab ( id int(2), name varchar(5) );
MariaDB [examdb]> INSERT INTO test_tab(id,name) VALUE(1,'KIM');
MariaDB [examdb]> SELECT * FROM test_tab;
+------+------+
| id   | name |
+------+------+
|    1 | KIM  |
+------+------+


DB 2

MariaDB [(none)]> GRANT select,insert ON *.* TO remote@'%' identified by '123';
Query OK, 0 rows affected (0.00 sec)

MariaDB [(none)]> flush privileges;
Query OK, 0 rows affected (0.00 sec)

MariaDB [(none)]> CREATE database examdb;
Query OK, 1 row affected (0.00 sec)

MariaDB [(none)]> use examdb;
Database changed
MariaDB [examdb]> CREATE table test_tab (id int(2), name varchar(5));
Query OK, 0 rows affected (0.06 sec)

MariaDB [examdb]> INSERT INTO test_tab(id,name) VALUE(2,'DB2');
Query OK, 1 row affected (0.02 sec)

MariaDB [examdb]> select * from test_tab;
+------+------+
| id   | name |
+------+------+
|    2 | DB2  |
+------+------+
1 row in set (0.00 sec)

MariaDB [examdb]> exit


방화벽 설정

firewall-cmd --add-service=mysql
firewall-cmd --add-service=mysql --permanent


외부 서버에서 두 개의 DB 서버에 원격 접속이 되는지 확인

1. 방화벽 설정: mysql 명령어 사용을 위한 작업

yum install -y mariadb
 
firewall-cmd --add-service=mysql
firewall-cmd --add-service=mysql --permanent

firewall-cmd --list-services
dhcpv6-client http mysql ssh


2. DB 1에 접속

mysql -u remote -h 10.0.2.10 -p
MariaDB [(none)]> use examdb;
MariaDB [examdb]> select * from test_tab;
+------+------+
| id   | name |
+------+------+
|    1 | KIM  |
+------+------+
1 row in set (0.00 sec)


3. DB 2에 접속

mysql -u remote -h 10.0.2.20 -p

MariaDB [(none)]> use examdb;
Reading table information for completion of table and column names
You can turn off this feature to get a quicker startup with -A

Database changed
MariaDB [examdb]> select * from test_tab;
+------+------+
| id   | name |
+------+------+
|    2 | DB2  |
+------+------+
1 row in set (0.00 sec)


로드밸런서 구성


설정 파일 생성

vi /etc/haproxy/haproxy.cfg

      1 global
      2         log             127.0.0.1 local2
      3         chroot          /var/lib/haproxy
      4         pidfile         /var/run/haproxy.pid
      5         maxconn         255
      6         user            haproxy
      7         group           haproxy
      8         daemon
      9
     10 defaults
     11         mode            tcp
     12         log             global
     13         timeout connect 30s
     14         timeout server  60s
     15         timeout client  60s
     16
     17 frontend        loadbalancer_db
     18         bind *:3306
     19         default_backend mariadb
     20
     21 backend mariadb
     22         balance roundrobin
     23         server  db01    10.0.2.10:3306  check
     24         server  db02    10.0.2.20:3306  check


부울 값 수정

semanage boolean -m  haproxy_connect_any --on
semanage boolean -l | grep haproxy_connect_any


서비스 재시작

systemctl restart haproxy


원격 접속하여 로드밸런싱 확인

1. 로드밸런서 서버에서 myql 방화벽 설정

yum install mariadb -y

firewall-cmd --add-service=mysql
firewall-cmd --add-service=mysql --permanent
firewall-cmd --list-services
dhcpv6-client http https mysql ssh


* 방화벽 설정이 되지 않았을 경우 아래와 같은 에러 발생


2. mysql -u remote -h 로드밸런서IP 주소 -p

mysql -u remote -h 10.0.2.50 -p
MariaDB [(none)]> use examdb;
No connection. Trying to reconnect...
Connection id:    12
Current database: *** NONE ***

Reading table information for completion of table and column names
You can turn off this feature to get a quicker startup with -A

Database changed
MariaDB [examdb]> select * from test_tab;
+------+------+
| id   | name |
+------+------+
|    2 | DB2  |
+------+------+


3. DB 1과 DB 2로 번갈아가며 접속됨


728x90

+ Recent posts