Ansible
220603_1_앤서블_응용_vagrant를 이용한 프로비저닝
kimhope
2022. 6. 3. 16:14
728x90
vagrant란
베이그런트의 장점: 쉬운 프로비저닝
- 사용자의 요구에 맞게 시스템 자원을 할당, 배치, 배포해 두었다가 필요 시 시스템을 즉시 사용할 수 있는 상태로 미리 준비함
베이그런트 기초 명령어
| 명령어 | 설명 |
| vagrant init | 프로비저닝을 해주는 예제 스크립트 생성 |
| vagrant up | Vagrantfile을 읽어 들여 프로비저닝 진행 |
| vagrant halt | 베이그런트에서 다루는 호스트들 종료 |
| vagrant destroy | 베이그런트의 호스트들 삭제 |
| vagrant ssh | 베이그런트의 호스트에 ssh로 접속 |
| vagrant provision | 베이그런트의 호스트의 설정 변경 적용 |
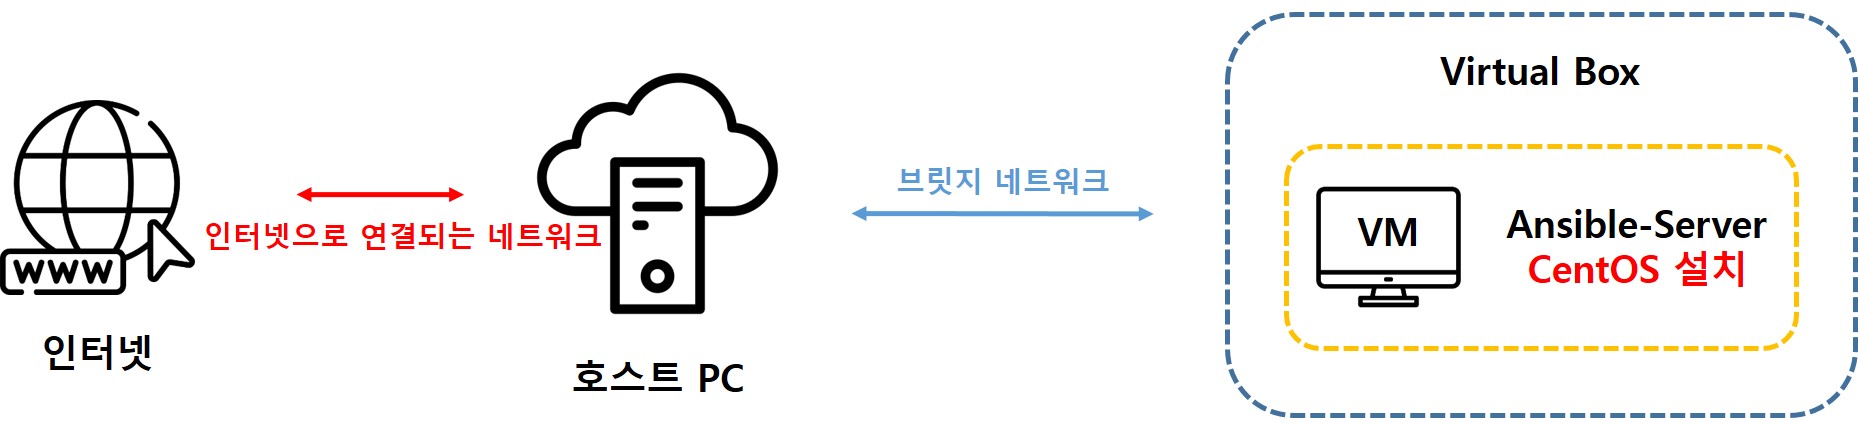
실습 개요
아키텍처
실습 과정
1. 노트패드 ++ 설치
2. 베이그런트 설치 및 초기화
3. 베이그런트 파일 수정 및 플러그인 설치
4. CentOS 이미지 설치
5. 베이그런트 ssh 접속 후 상태 확인
노트패드 ++ 설치
아래 링크로 접속하여 설치 파일 다운로드
https://notepad-plus-plus.org/downloads/
Downloads | Notepad++
notepad-plus-plus.org
다운로드한 파일을 실행하여 디폴트 값으로 설치 진행
베이그런트 설치 및 초기화
베이그런트 역시 마찬가지로 아래 링크로 접속하여 설치 파일을 다운로드하고 설치 진행
Vagrant by HashiCorp
Vagrant enables users to create and configure lightweight, reproducible, and portable development environments.
www.vagrantup.com
cmd 창에서 vagrant를 입력해 베이그런트가 정상적으로 설치된 것을 확인함

vagrant init: 베이그런트 환경 설정 및 샘플 코드 생성
주의: vagrant 환경 설정 시 경로에 빈 공간이 있으면 정상적으로 실행되지 않으므로 경로 변경 필요
C:\Users\khj78>cd C:\HashiCorp

C:\HashiCorp>vagrant init
A `Vagrantfile` has been placed in this directory. You are now
ready to `vagrant up` your first virtual environment! Please read
the comments in the Vagrantfile as well as documentation on
`vagrantup.com` for more information on using Vagrant.
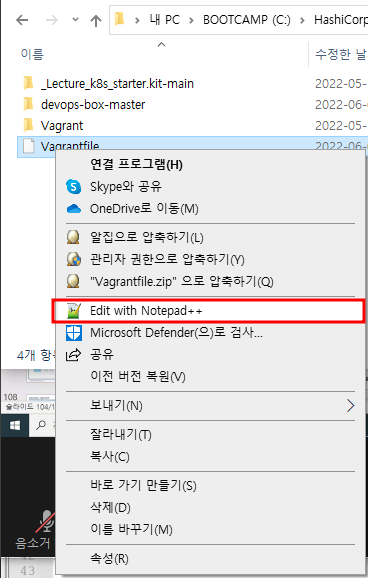
베이그런트 파일 수정 및 플러그인 설치
Vagrantfile을 notepadd++로 실행
아래 링크에서 이미지를 다운로드하므로 해당 링크로 접속하여 centos/7을 복사
https://app.vagrantup.com/boxes/search
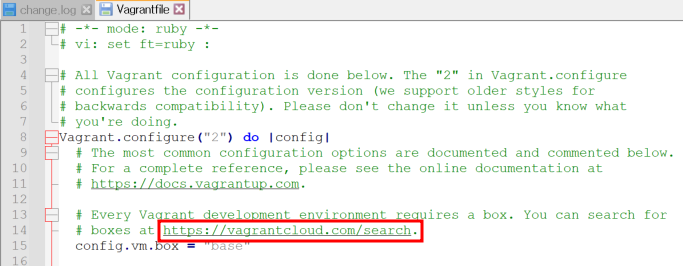

옵션 값 변경
# base 를 centos/7으로 변경
config.vm.box = "centos/7"

# 윈도우와 CentOS 간의 공유 디렉토리를 설정하는 부분: 사용하지 않도록 설정
config.vm.synced_folder ".", "/vagrant", disabled: true
수정 사항 저장: ctrl + s
플러그인 설치
C:\HashiCorp>vagrant plugin install vagrant-vbguest
Installing the 'vagrant-vbguest' plugin. This can take a few minutes...
Fetching micromachine-3.0.0.gem
Fetching vagrant-vbguest-0.30.0.gem
Installed the plugin 'vagrant-vbguest (0.30.0)'!
CentOS 이미지 설치
vagrant up
C:\HashiCorp>vagrant up

# 작업 진행 과정
# centos7 이미지를 다운로드하고
# 버추얼 박스에 이미지를 삽입 후 설치를 진행함
# 확장 100을 설치함
베이그런트 ssh 접속 후 상태 확인
vagrant ssh
생성된 가상 머신에 접속
C:\HashiCorp>vagrant ssh
[vagrant@localhost ~]$
728x90